
Technical Specifications & Installation Resources
Gable-End Vents
Access everything you need to install or specify BrandGuard’s Self-Closing Gable Vents. Below you’ll find step by step install guides, installation videos, testing certifications, CAD and REVIT files – all available to be instantly downloaded onto your mobile device or PC.
Installation Guides
You don’t need to be a pro – BrandGuard Vents are easy to install.
Planning to upgrade your current home or build a new one? BrandGuard’s Wildfire-Resistant Gable Vents are made to fit a wide range of construction designs with ease.
Gable End Vent Installation: New Construction
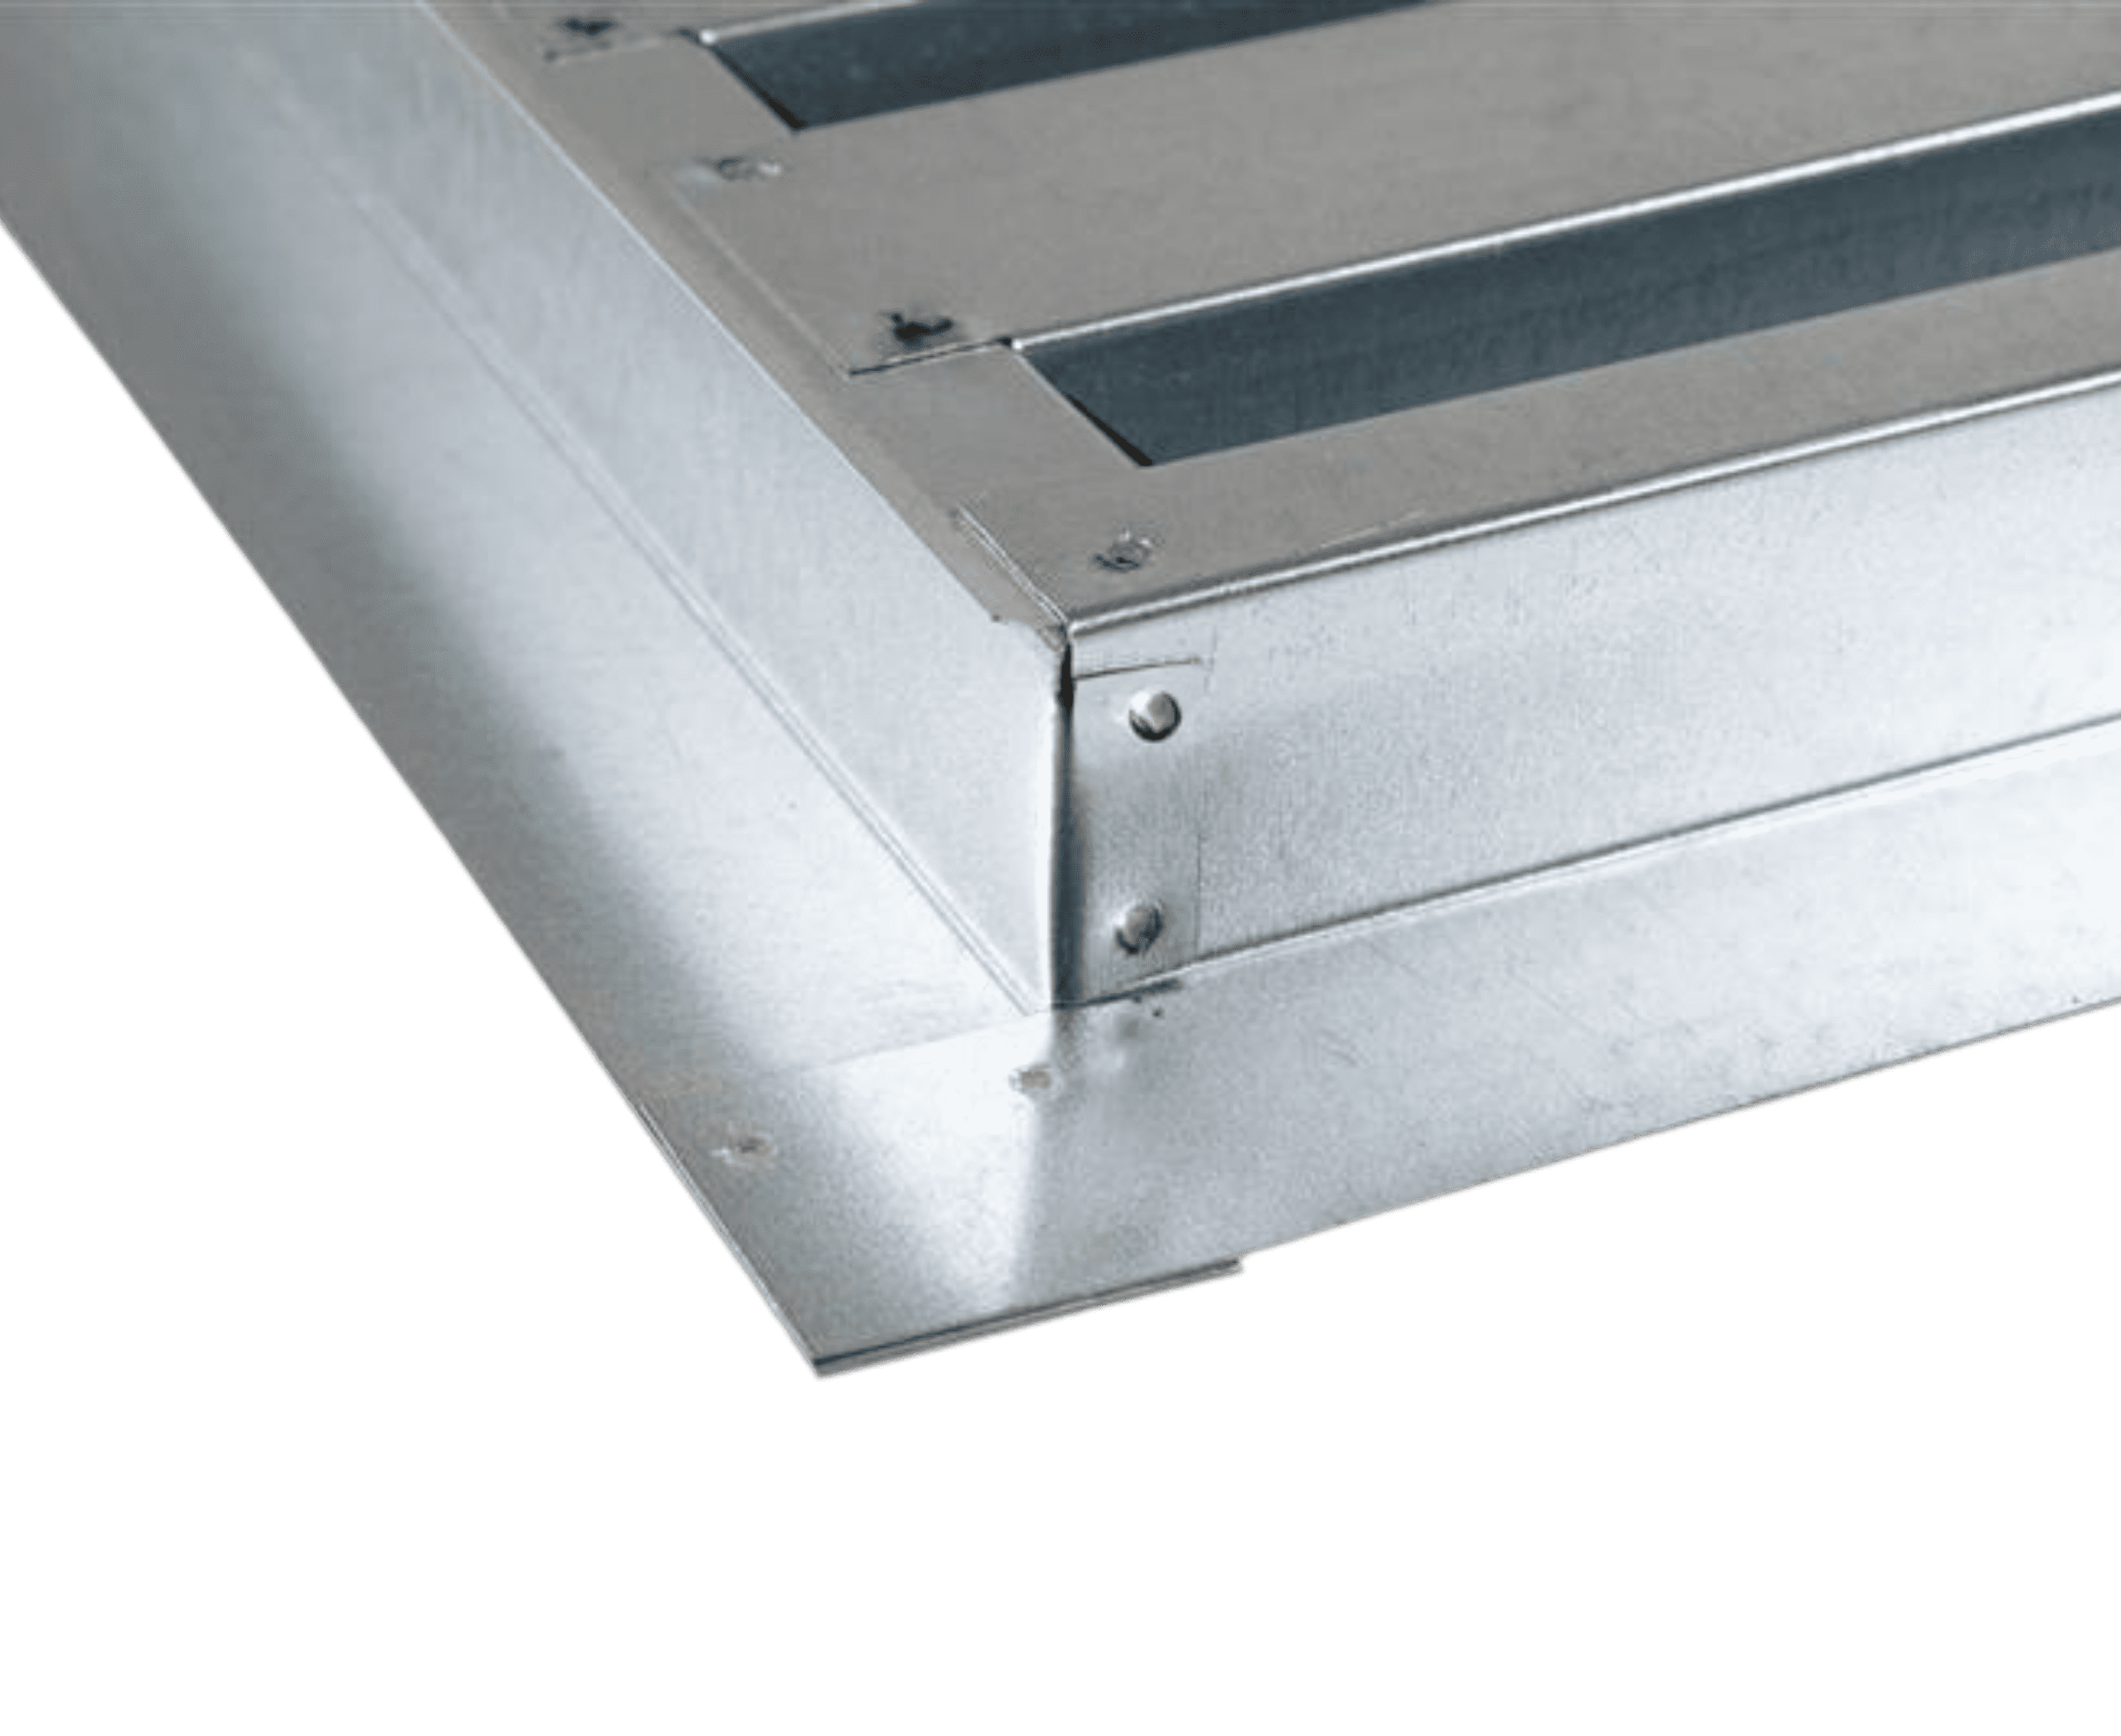
Planning a custom home or a new multifamily development? Ensure compliance with California Building Code Chapter 7A by incorporating BrandGuard’s Flame-Resistant Gable End Vents into your design. These vents install just like standard models – but come equipped with a triple-layer defense system to help safeguard structures against wildfire exposure.
Retrofitting Existing Gable Vents with BrandGuard
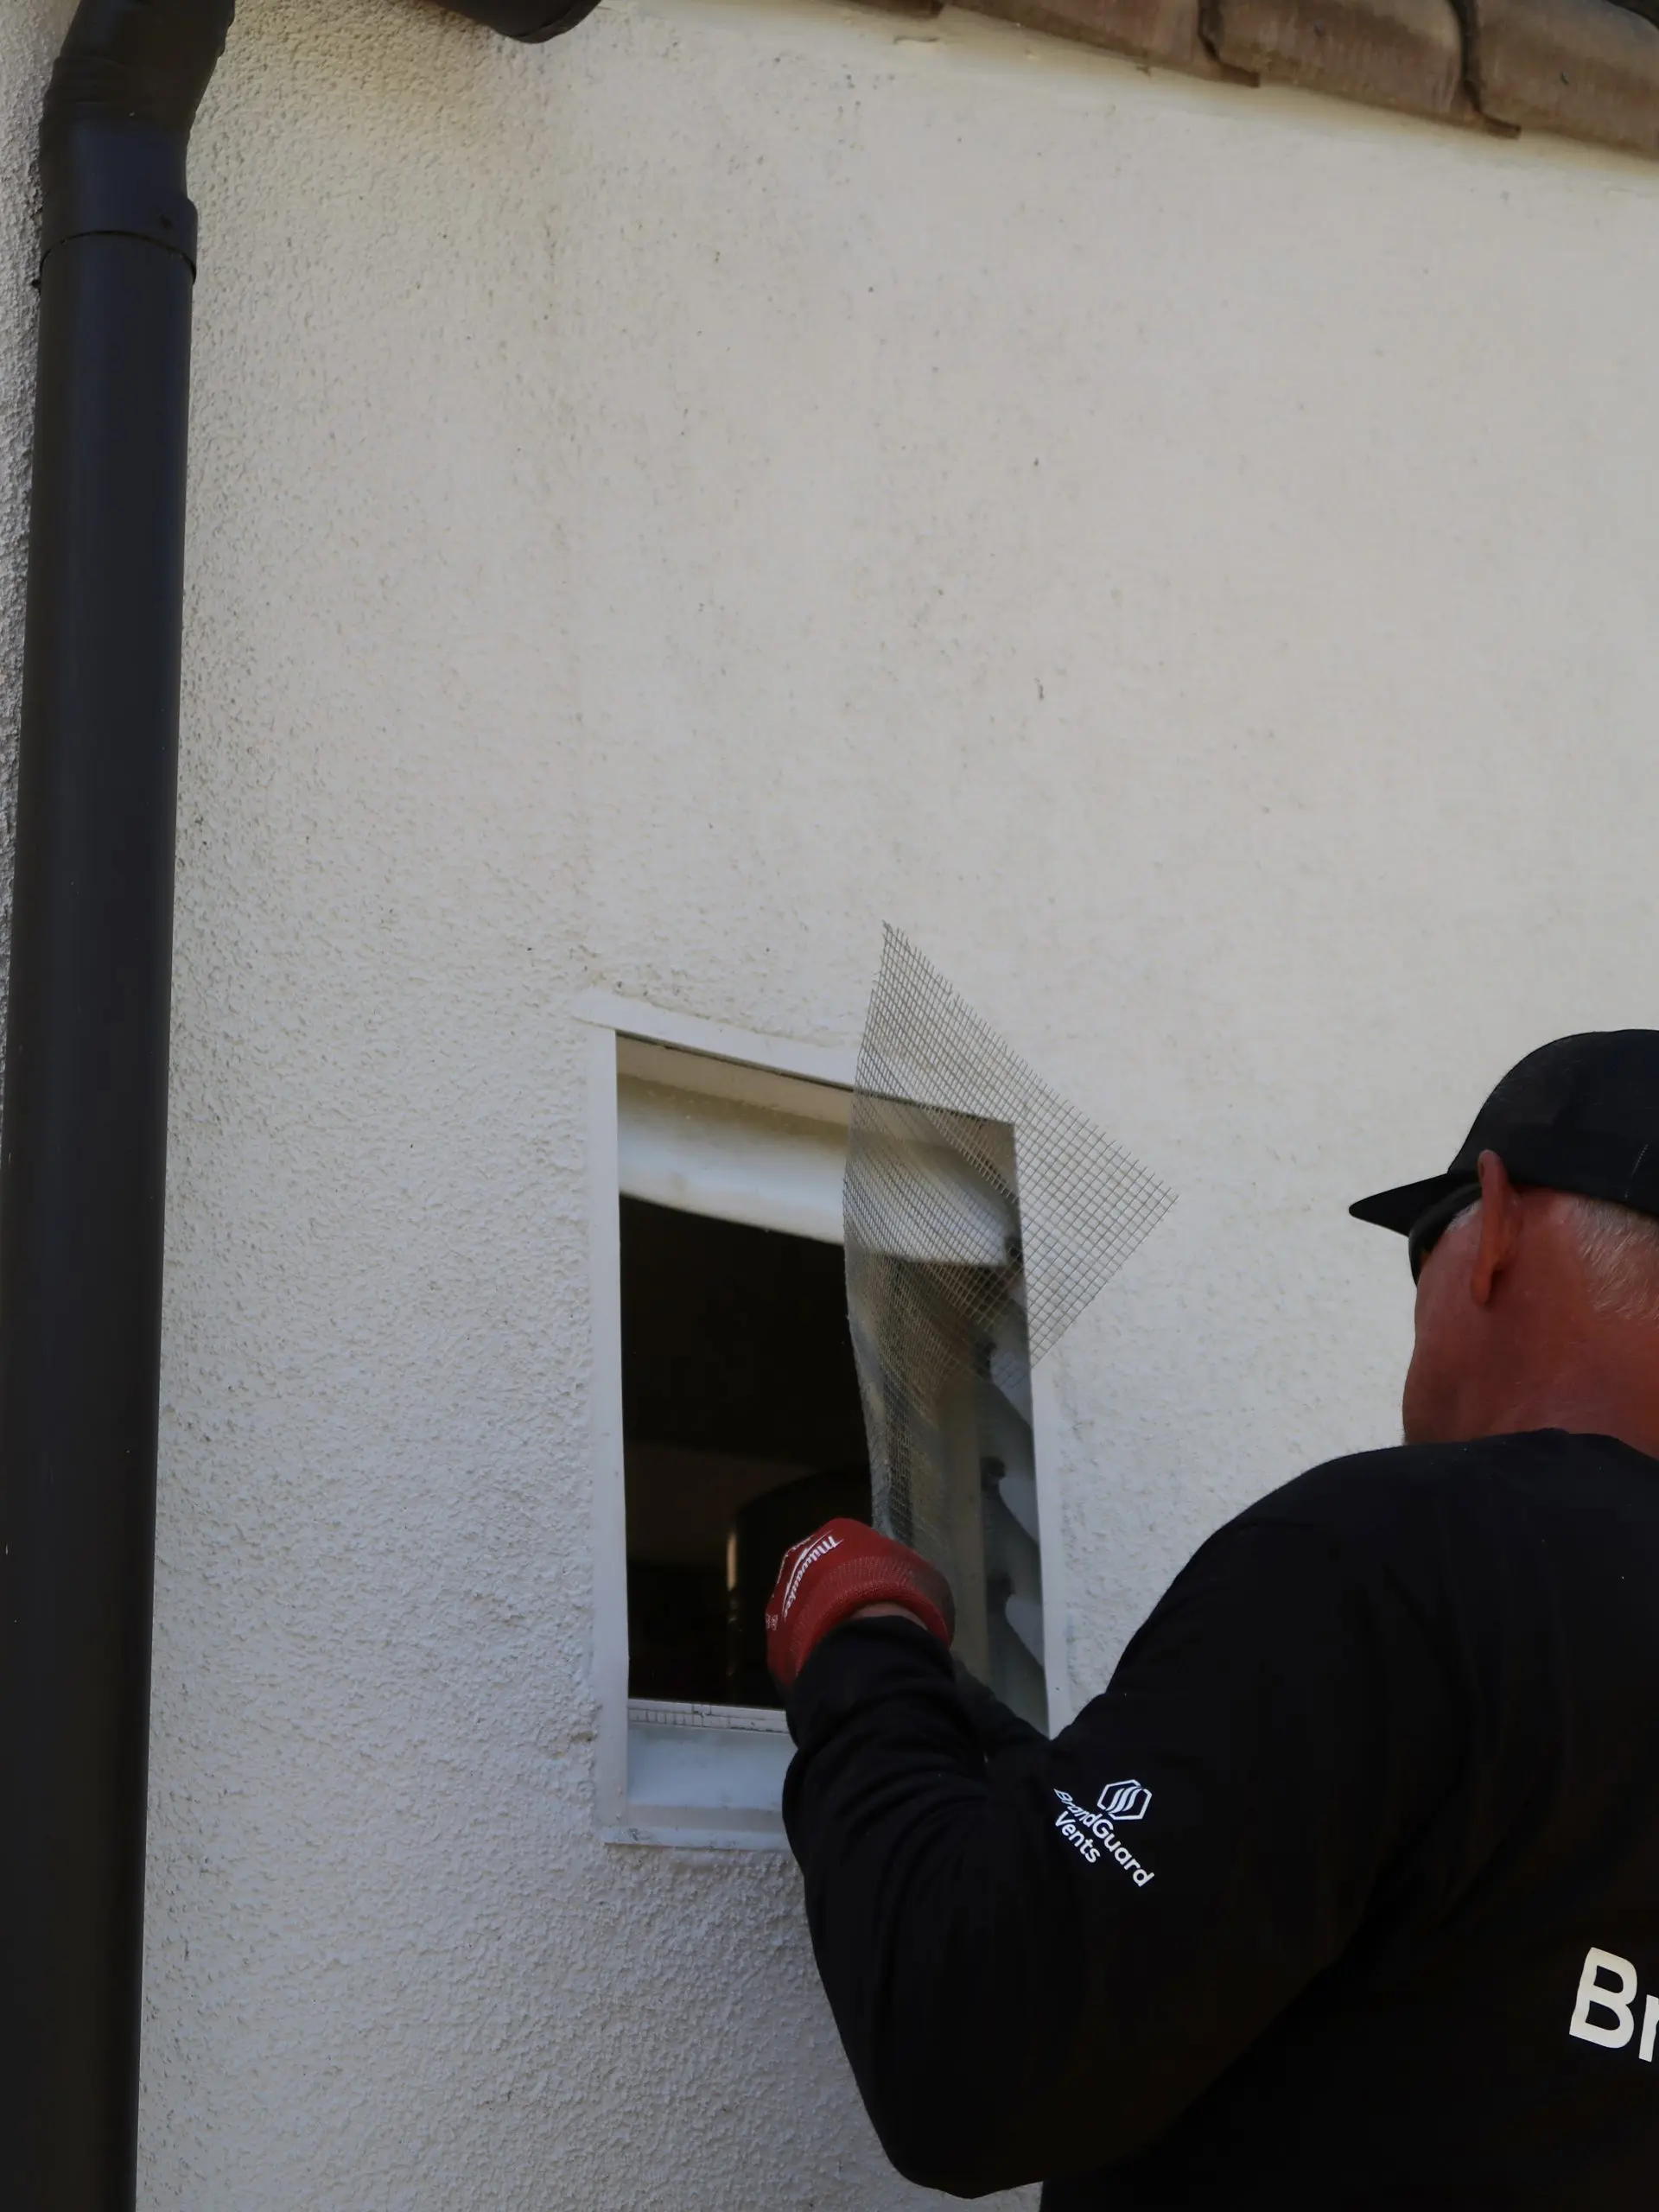
Installing BrandGuard’s retrofit fire- and ember-resistant gable end vents. Just insert the appropriately sized vent into the existing opening where the old vent was removed. Secure it using the recommended screw fasteners and seal it with exterior-grade clear caulking, rated with a minimum 20-year warranty for long-lasting protection.
Step 1: Measure and Prepare
Measure the width and height of the existing vent opening to select the correct size. If replacing an old vent, remove horizontal slats as needed. Clean the vent surface with a vinegar wipe, then prime and paint the baffle side and screws using exterior-grade products. Allow to dry completely.
Step 2: Cut and Seal
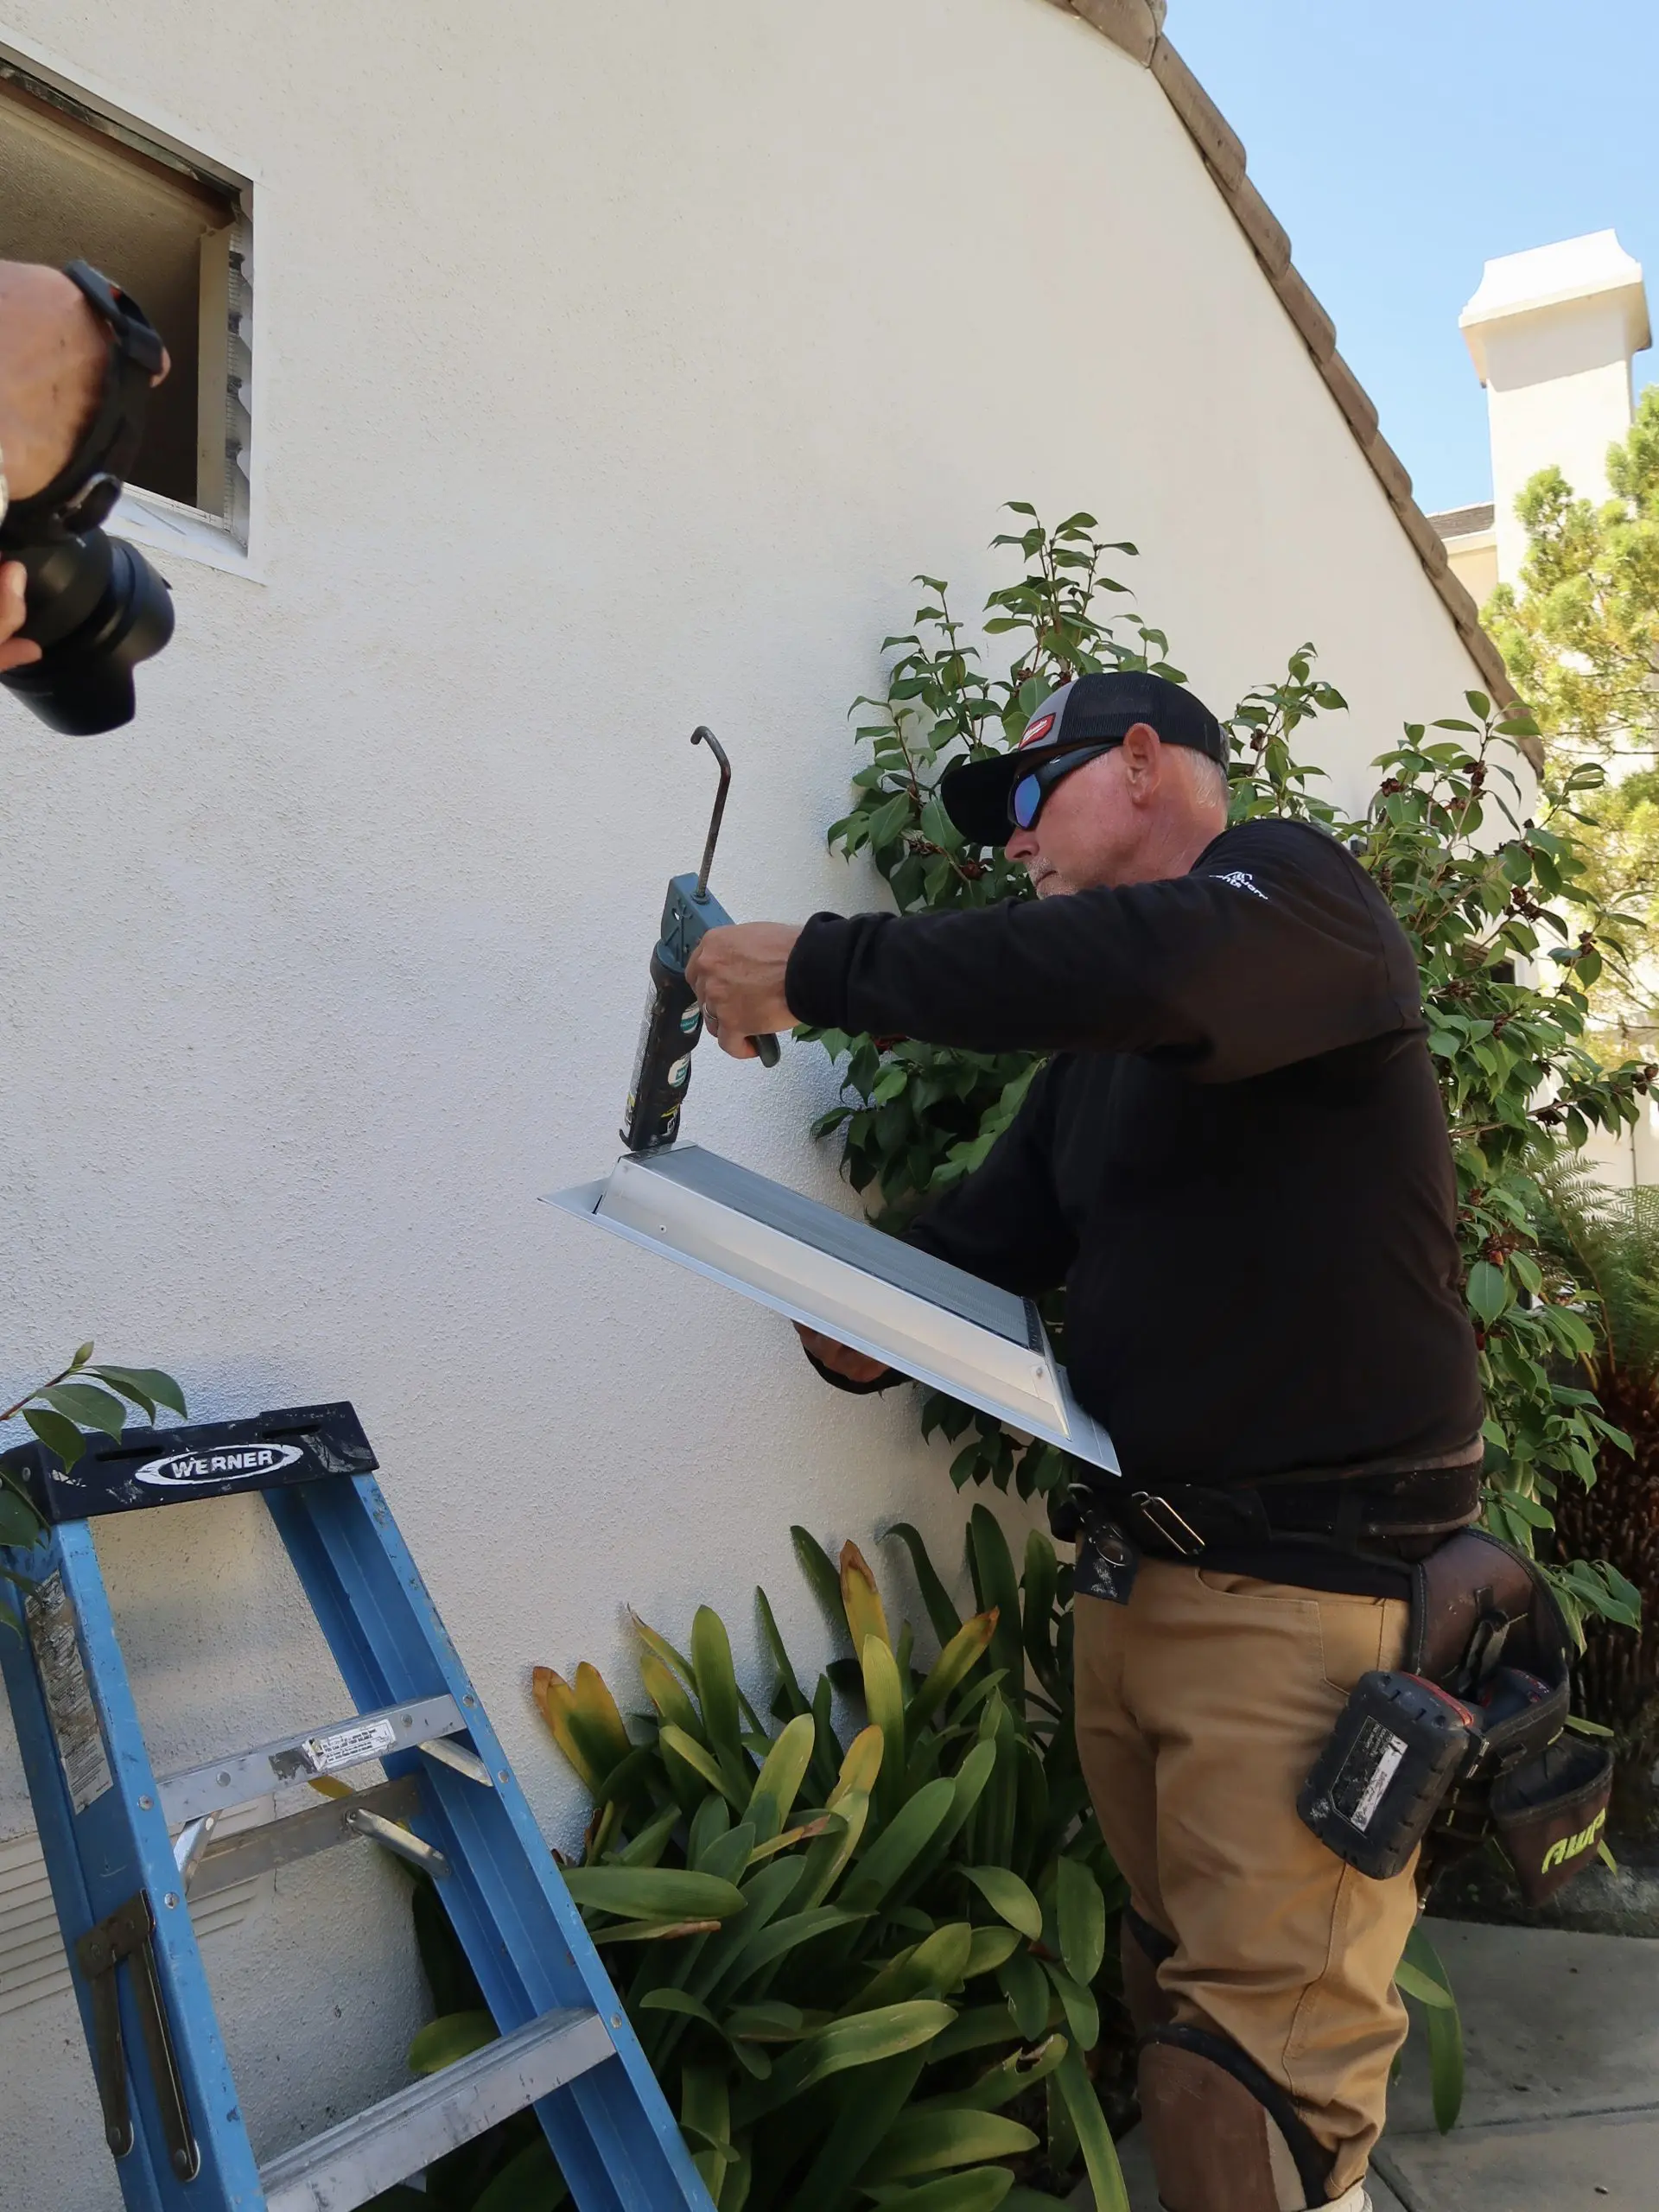
Cut the vent opening into plywood or siding if needed. Apply a bead of exterior-approved clear or paintable caulking (minimum 20-year warranty) behind and around the flange of the vent to ensure a secure, weather-resistant seal.

Step 3: Install and Secure
Insert the vent with vertical baffles facing outward and mesh facing inward, ensuring the bottom slope is correctly positioned. Use a level for proper alignment. Secure with galvanized self-drilling screw in all corners and every 4 inches. Finish with a final bead of caulking around the outer edge for a clean, sealed fit.
Technical Specifications by Size
Compare vent models by size, airflow, material, and compliance ratings to find the right fit for your project.
| Size (W x L) | Model # | Flange | NFVA (Airflow) | Spec Sheets |
|---|---|---|---|---|
| 12″ w x 12” h | GV2011-FF | Flange Front / Retrofit | 38.6 sq in | Download Spec Sheet |
| GV2011-PG | Stucco/Plaster/ J Channel | 38.6 sq in | Download Spec Sheet | |
| GV2011-FB | Hardie/Fiber Cement | 38.6 sq in | Download Spec Sheet | |
| GV2011-FO | 1.5” Setback | 38.6 sq in | Download Spec Sheet | |
| 12” w x 18” h | GV2021-FF | Flange Front / Retrofit | 60.9 sq in | Download Spec Sheet |
| GV2021-PG | Stucco/Plaster/J Channel | 60.9 sq in | Download Spec Sheet | |
| GV2021-FB | Flange Back | 60.9 sq in | Download Spec Sheet | |
| GV2021-FO | 1.5” Setback | 60.9 sq in | Download Spec Sheet | |
| 14” w x 18” h | GV2041-FF | Flange Front / Retrofit | 71.1 sq in | Download Spec Sheet |
| GV2041-PG | Stucco/Plaster/J Channel | 71.1 sq in | Download Spec Sheet | |
| GV2041-FB | Flange Back | 71.1 sq in | Download Spec Sheet | |
| GV2041-FO | 1.5” Setback | 71.1 sq in | Download Spec Sheet | |
| 14” w x 24” h | GV2051-FF | Flange Front / Retrofit | 97.6 sq in | Download Spec Sheet |
| GV2051-PG | Stucco/Plaster/J Channel | 97.6 sq in | Download Spec Sheet | |
| GV2051-FB | Flange Back | 97.6 sq in | Download Spec Sheet | |
| GV2051-FO | 1.5” Setback | 97.6 sq in | Download Spec Sheet | |
| 18” w x 24” h | GV2071-FF | Flange Front / Retrofit | 127 sq in | Download Spec Sheet |
| GV2071-PG | Stucco/Plaster/J Channel | 127 sq in | Download Spec Sheet | |
| GV2071-FB | Flange Back | 127 sq in | Download Spec Sheet | |
| GV2071-FO | 1.5” Setback | 127 sq in | Download Spec Sheet | |
| 22” w x 30” h | GV2081-FF | Flange Front / Retrofit | 186 sq in | Download Spec Sheet |
| GV2081-PG | Stucco/Plaster/J Channel | 186 sq in | Download Spec Sheet | |
| GV2081-FB | Flange Back | 186 sq in | Download Spec Sheet | |
| GV2081-FO | 1.5” Setback | 186 sq in | Download Spec Sheet |
CAD and Revit Drawings
Looking to specify BrandGuard Vents into your next project? Access all of our Revit BIM and CAD file downloads instantly! Please complete the form below to access materials.
Certifications
Gable End Vent CAL Fire Certification
More information
Frequently Asked Questions
The essential questions, answered.
How do Brandguard Vents™ work?
Home hardening is a critical factor to improve the survivability of structures during wildfires. All homes have vulnerable “point of entry” that must be sealed to avoid hot embers and fire from entering the structure. Home ventilation is essential from an energy saving point of view, however in case of a fire nearby, there is a risk of hot embers finding their way into your attic, basement, garage, etc. BrandGuard has patented a unique system to keep embers from entering your house. Our design consists of multiple line of defense:
- A baffle design which allows air to move freely, but traps embers
- BrandGuard propriety intumescent material, which expand only if high heat and extreme flames are reaching the vents
- Non combustible, metal vents which resist heat and flames
How are Brandguard Vents™ different than standard vents?
BrandGuard Vents resists the intrusion of flame and embers into your attic through the building’s vents, thus protecting your home from dangerous flying embers created by wildfires.
Standard Vents do not offer any protection against flying embers and fire.
Why are baffles better for protection?
Baffles have long been used in commercial kitchens as a way to prevent stovetop fires. We have redesigned them to help keep flames, dangerous burning embers, and radiant heat out of your home during a wildfire. Baffles provide immediate protection during a wildfire from the very first second of exposure.
Another reason baffles are better is because they provide protection from driving rain, snow, and rodents. Our vents have passed stringent driving rain tests in Hurricane labs in Florida keep heavy driving rain out at even 140mph! Rodents are unable to chew or squeeze through our vents like they do with regular mesh vents, making them an excellent option for pest control!
What is an intumescent material?
BrandGuard Vents are equipped with a propriety material (intumescent) which expands in case of fire. The thermally activated strip expands up to 30 times its original thickness, sealing off the vent completely. This is an extreme measure to make sure that fire doesn’t penetrate the home.
Are custom vents/products available?
Yes, BrandGuard Vents will work with you and your needs to create a custom fire prevention vent for your project.
How are the vents installed?
BrandGuard Vents are installed like any traditional vent with the same footprint. Our line of retrofit fire Vents can be easily inserted over existing vents without any damage to the structure. They are held in place by applying appropriate screw fasteners. They can also be installed from inside the attic. Please see our installation instructions.

Still have questions?
Talk to our experts for no-obligation advice and support.